How to Fix a Rotted Windowsill: Step-by-Step DIY Repair Guide
Table of Contents
- Rotted Windowsill Repair: What Centennial and Parker, Colorado Homeowners Need to Know
- Before You Begin: Tools, Materials, and Safety Preparations
- Step 1: Assess the Extent of Rot and Check Wall Framing
- Step 2: Remove Rotted Wood and Clean the Window Sill
- Step 3: Apply Wood Consolidant to Strengthen Remaining Wood
- Step 4: Fill Voids with Epoxy Wood Filler
Rotted Windowsill Repair: What Centennial and Parker, Colorado Homeowners Need to Know
Knowing how to fix a rotted windowsill starts with a proven epoxy repair method that consolidates soft wood and rebuilds rotted sections, as detailed by Fine Homebuilding. In Centennial and Parker, Colorado, seasonal freeze-thaw cycles and melting snow can trap moisture behind window trim, accelerating wood rot. The repair process involves removing all decayed material, drilling small holes into sound wood for deep penetration of a liquid consolidant, and then building up the area with a two-part epoxy filler like WoodEpox. Fine Homebuilding’s experts note that using a consolidant such as Abatron’s LiquidWood requires at least 24 hours of drying before filling. This approach restores structural integrity and prevents future damage. At ACN Construction, we provide professional repair services done by experts. Let us help you get your project started. Before you can start, you need to gather the proper tools and materials and ensure the wood is dry enough for treatment.
Key Takeaways
- Wear standard protective equipment while working with this type of chemical compound: heavy-duty gloves, eye protection and a respirator or mask that has been approved as safe when used for epoxy products and sanding dust.
- Start by probing around the window sill for any soft or spongy areas.
- First up is to start with taking off any damaged wood that has rotted down until you get back to dry, solid stuff.
- Use the epoxy-based wood consolidation solution such as LiquidWood to solidify any remaining wood, and prevent future damage to the sill.
- Fill the void with a two-part epoxy wood filler like Abatron WoodEpox to provide a durable, sandable repair.
Before You Begin: Tools, Materials, and Safety Preparations
Western Red Cedar and Redwood are the top choices for replacement sill stock — both species contain natural fungicides that resist decay.
- Epoxy-based consolidants like Abatron’s LiquidWood and WoodEpox strengthen weakened wood fibers after removing decayed material, a best practice detailed by Fine Homebuilding; allow penetrating consolidants time to cure before filling voids.
- Use drill bits sized to reach roughly halfway through the sill thickness and drill staggered holes about 1 inch apart so liquid consolidant penetrates deeply into the grain.
- Oil-based primers formulated for raw exterior wood penetrate and bond more effectively than water-based alternatives; prime all six sides of a new sill — including the end grain — and seal the end grain to prevent moisture wicking.
- Shape the replacement sill with a forward slope of 5 to 15 degrees so water drains away rather than pooling on the surface.
Wear standard protective equipment while working with this type of chemical compound: heavy-duty gloves, eye protection and a respirator or mask that has been approved as safe when used for epoxy products and sanding dust. Once you have all your materials on hand as well as the appropriate safety equipment, you will be able to look over both the sill board and the siding in order to check whether there is any internal damage present.
ACN Construction applies these preparation standards on our Centennial projects to produce durable, long-lasting repairs.
Step 1: Assess the Extent of Rot and Check Wall Framing
Start by probing around the window sill for any soft or spongy areas. Fine Homebuilding suggests that you should drill small test holes in those locations to gauge how deeply the decay reaches.
Following this inspection on the sill, then look at the framing inside your wall. Any water stains, black spots from mold growth, or parts that feel soggy are signs of moisture in the framing and mean the structural problem must be addressed before continuing. If your concern lies around frame deterioration, please call a licensed professional such as ACN Construction to have them take a look.
Check out where moisture came from causing this rot. Check if there’s missing or improperly flashing drip caps that have trapped water on the sill. This way you can ensure the water is able to drain correctly. Parker homeowners learning to fix a rotten bay window sill at home will use the same prying and drilling methods. After mapping all the soft spots and having good framing underneath them, the rotted wood can be taken off and the sill prepared for repair.
Step 2: Remove Rotted Wood and Clean the Window Sill
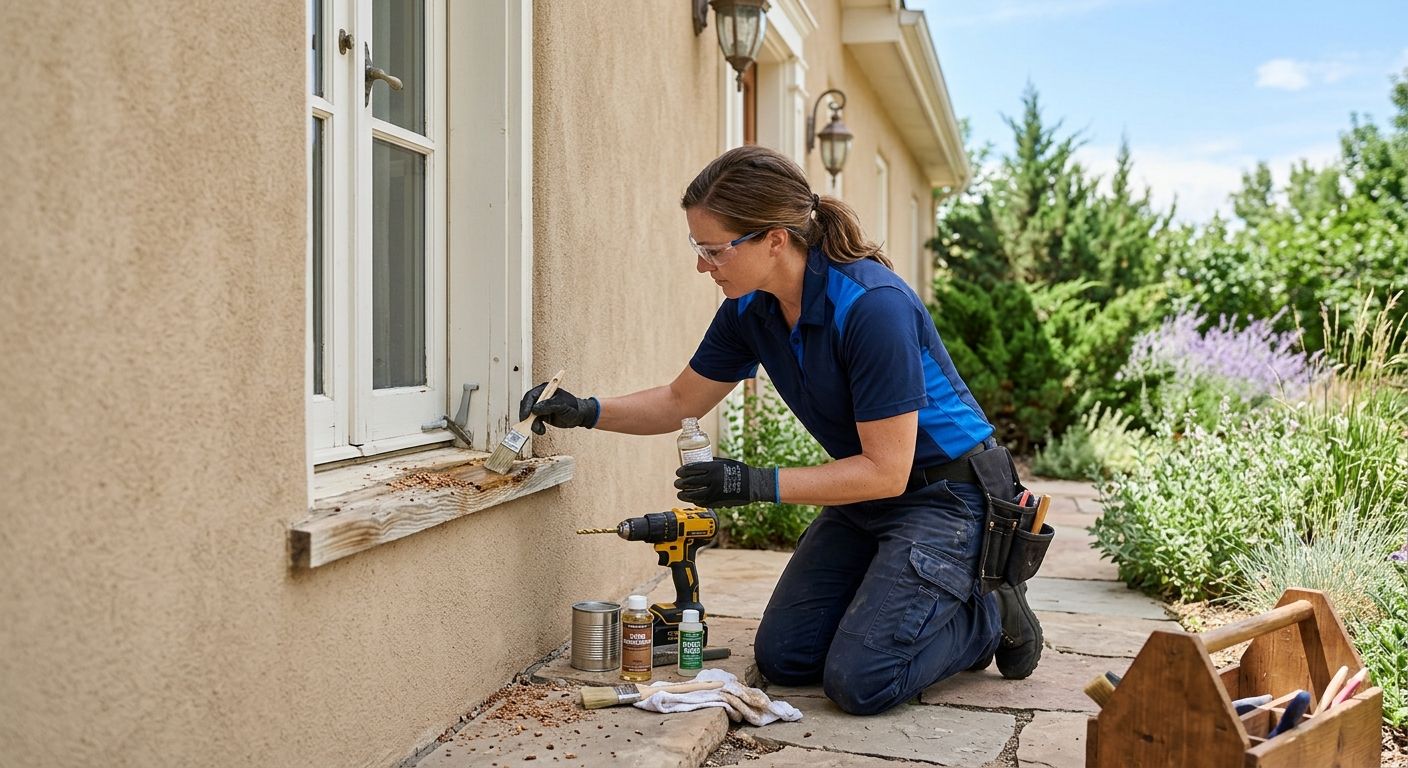
First up is to start with taking off any damaged wood that has rotted down until you get back to dry, solid stuff. With a sharp chisel or a flat pry bar, carefully scrape out the mushy, flaky fibers. When in doubt, don’t go outside the damaged area. If the rot extends deep into the sill, we drill a series of staggered holes an inch apart and halfway through the thickness to allow future wood consolidant to penetrate, as the guide recommends. This will give future consolidants room for entry and allows them to better work their magic. After we’ve done all this cleaning out, then we can vacuum the space to make sure there’s no dirt left behind, and we also can wipe the surface off with a clean, dry cloth. When rot approaches a drip cap, we check that the cap’s design still allows water to weep out; trapping moisture at the cap will cause future decay. When you’re replacing your rotted outside windowsill, the same process applies to getting rid of all the rotten stuff, as well as cleaning it off afterwards, before applying a wood consolidating compound which will help reinforce what remains.
Step 3: Apply Wood Consolidant to Strengthen Remaining Wood
Use the epoxy-based wood consolidation solution such as LiquidWood to solidify any remaining wood, and prevent future damage to the sill. Due to its low viscosity, the epoxy can seep through pores in the wood fibers.
We drill a series of small holes into the sound wood to allow the consolidant to penetrate deeply. According to Fine Homebuilding, drilling holes approximately 1 inch apart, staggered, and to about half the thickness of the wood ensures the liquid reaches deep into the grain. We apply the consolidant, working it into the holes and across the surface until the wood can absorb no more.
As instructed by the maker, we give the consolidant time to cure until there is at least 24 hours. While the consolidant cures, we also address the underlying moisture cause; adding a drip cap or proper flashing helps prevent repeated damage. Once it is done curing, we will then fill in any voids in preparation to install the epoxy wood filler on the sill to restore its profile and strength.
Step 4: Fill Voids with Epoxy Wood Filler
Fill the void with a two-part epoxy wood filler like Abatron WoodEpox to provide a durable, sandable repair. Once the wood consolidant has set up, at least 24 hours, remove all loose and severely deteriorated wood from the voids. As noted in the magazine, drill small holes approximately 1" apart and staggered around the void, reaching about half-way into the solid wood. Drilling deeply anchors the filler for superior bond strength.
Filler should be mixed according to manufacturer’s directions and packed tightly and thoroughly into cleaned drilled out recessions. Work the material down into all crevices using a putty knife making sure to fill any gaps or air pockets that appear. When applying filler Overfill slightly higher than your surrounding area ensuring that there will be some left over to be able to shape and sand in the final step to bring the filler up even with the existing surface.
Step 5: Shape and Sand the Repair for a Seamless Profile
After the epoxy filler has fully cured from Step 4, we can shape and sand the repair to blend it seamlessly with the sill’s original profile. We begin rough shaping with a rasp or coarse file to remove excess material and establish the basic contours. To match the profile accurately, we recommend using a contour gauge or a cardboard template from the opposite side of the sill, checking frequently against the reference shape.
Once the profile has been established, it’s time for sanding using successively finer grits of dry sandpaper from 80 to 120, 150, and finally 220. This step should take out any remaining bulges in the area and prepare the surface to accept paint. Run a straight edge across the repaired section to ensure that there aren’t high or low areas present. A straightedge held across the repair helps identify high spots and avoid creating a low depression. If over-sanding does produce a slight hollow, a thin skim coat of epoxy filler can be reapplied and re-sanded after curing.
When your surface looks smooth it’s time to apply the primer and paint the sill.
Step 6: Prime and Paint the Window Sill for Durability
A properly sealed window sill relies on an oil-based primer to block moisture intrusion at the wood’s most vulnerable points. We prime every surface, top, bottom, ends, and sides, with special attention to the end grain, the primary entry point for water.
An oil based primer will bond deeper and create a more solid barrier when applied to raw wood than a water-based formula does. We also make sure that we seal any exposed ends of the wood to prevent moisture from being absorbed through the exposed wood, which can lead to the problem occurring again. After this process we allow the primer to cure according to the manufacturer’s instructions, then apply our final coat of high-durability exterior-grade paint that resists UV light, rain, and temperature swings while preserving the sill’s forward slope for effective drainage.
After the paint cures, we recommend adding a drip cap above the sill to deflect bulk water and extend the life of your repair. This metal flashing completes the weatherproofing system and further shields the newly finished sill.
Step 7: Install Drip Caps and Improve Water Drainage
Install a metal drip cap which creates an overhang measuring 1/4 inch that lets the water drip free rather than seep behind the trim. Secure it using screws that won’t rust, then ensure that this cap fits tightly against the house wrap so there are no cracks or openings for leaks.
Expert construction engineering advice from EngineerFix underscores that the sill must slope forward at a 5-to-15-degree angle, roughly 1/15 of its depth. Re-establishing the original slope with a quality wood filler before setting the cap delivers the best long-term results.
Before final installation, seal all exposed end-grain cuts with an oil-based primer. EngineerFix notes that end grain wicks moisture more aggressively than face grain, and an oil-based primer blocks absorption that leads to hidden decay.
If we can figure out how to fix a rotted windowsill and install a drip cap, maintain some forward slope and seal up the end grain, then there would be much less chance that in time we will have issues with rotten wood again.
Troubleshooting Common Repair Challenges
Existing rot in an exterior windowsill must be repaired using a systematic approach that combines proper material selection, preparation, and effective moisture management.
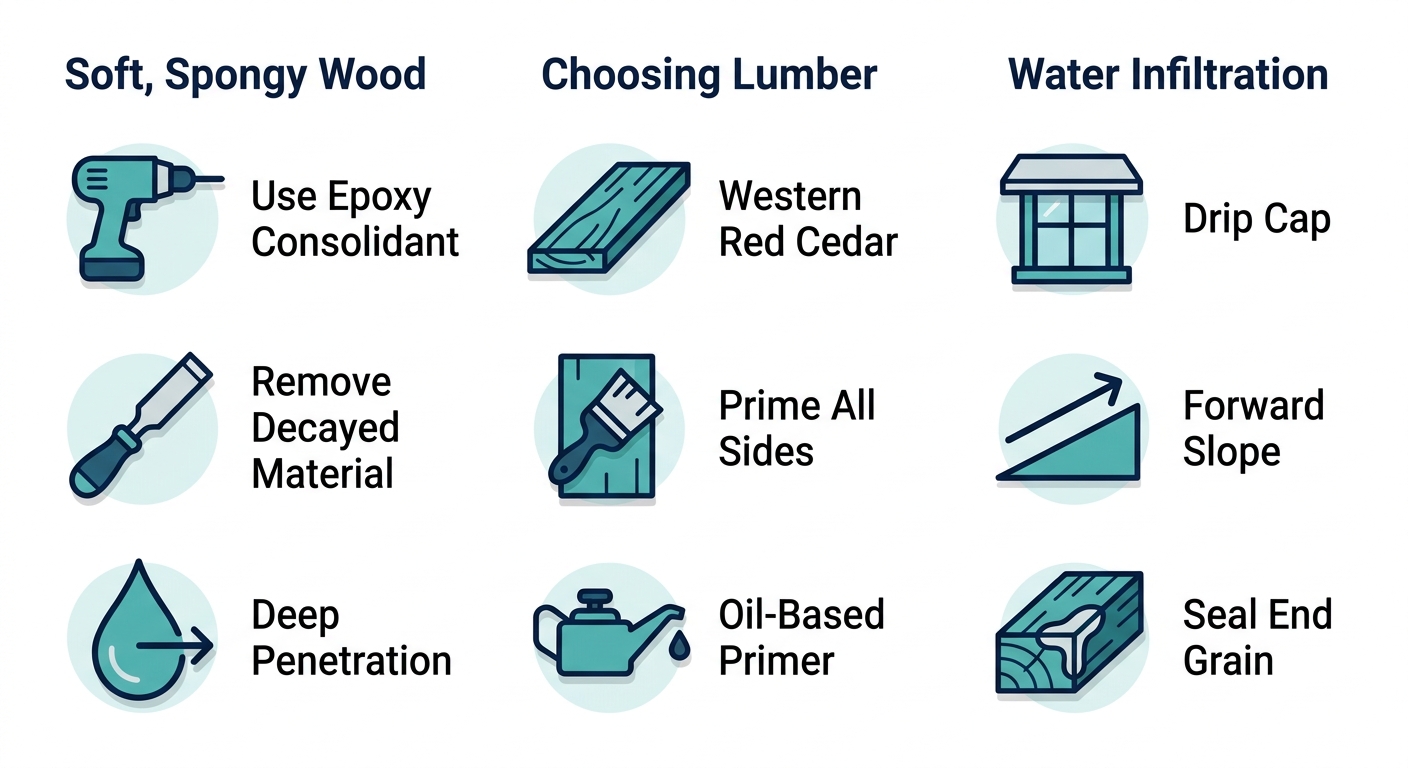
- Soft, spongy wood – For soft, spongy wood, a consolidant such as LiquidWood hardens the damaged fibers before filling voids with WoodEpox. A guide advises drilling staggered holes to aid deep penetration, then allowing a 24-hour cure. This method restores strength without removing the entire sill, provided the moisture content stays below 17%.
- Choosing replacement lumber – When a partial replacement is necessary, select a rot-resistant species. The site recommends Western Red Cedar, Redwood, or pressure-treated lumber. Prime all six sides—especially the end grain—with an oil-based primer to seal the cut ends and prevent moisture wicking that restarts the decay cycle. Cedar’s natural thujaplicins provide added fungal resistance.
- Water infiltration after repair – For lasting water protection, Sources emphasize that a forward pitch of 5–15 degrees and a drip cap above the window are essential. Sealing the sill-to-wall joint with quality caulk and conducting biennial inspections catch early moisture before rot re-establishes.
Fixing up your windowsill by systematically addressing each challenge can let it last for decades.
 Visual guide to troubleshooting window sill rot with epoxy consolidants, proper lumber selection, and water infiltration prevention.
FAQ: Rotted Windowsill Repair
Is it Better to Repair a Rotted Windowsill or Replace the Entire Window?
It is typically better to repair a rotted windowsill instead of replacing the entire window. Epoxy repair methods using consolidants like LiquidWood and fillers like WoodEpox restore structural integrity and extend the sill’s lifespan without the higher cost of full window replacement. The process removes decayed wood, treats remaining sound wood, and rebuilds the profile, provided the framing is intact.
What are the best materials to use for repairing rotted wood window sills?
The best materials are epoxy-based consolidants such as Abatron’s LiquidWood to strengthen weakened fibers and two-part epoxy fillers like WoodEpox to rebuild missing sections. For partial replacement, Western Red Cedar or Redwood are recommended for their natural fungicide properties. Always use oil-based primers on all sides, especially end grain, to seal moisture out.
Can a professional contractor fix a rotted windowsill without replacing the whole unit?
Yes, a professional contractor can repair a rotted windowsill without replacing the whole unit. ACN Construction provides this service, using epoxy consolidants and fillers after removing decayed wood. Their process includes moisture management, proper priming, and drip cap installation to deliver a durable, long-lasting repair while preserving the original window.
How do I prevent wood rot from recurring on my window sills?
Prevent wood rot recurrence by installing a metal drip cap above the sill, maintaining a forward slope of 5 to 15 degrees for drainage, and sealing all wood surfaces—especially end grain—with an oil-based primer. Use rot-resistant woods like Western Red Cedar or Redwood, and inspect caulk joints biennially. Managing moisture with proper flashing also prevents decay.
How can I Tell if Window Rot has Spread to the Wall Framing?
Signs that rot has spread to wall framing include water stains, black spots of mold growth, or areas that feel soggy and soft when probed. Inspect inside the wall around the window frame for these indicators. If you find any, the structural framing is compromised and a licensed professional, such as ACN Construction, should evaluate and address the damage before sill repair proceeds.
Ensuring Long-Lasting Windowsills with ACN Construction
Western Red Cedar, as well as Redwood wood species, resist rot, and Experts note epoxy consolidants can restore sills when moisture is managed. We implement those methods in order for our repairs to last through Colorado weather conditions.
We’re the design build partner in Centennial and across the Denver metro area who takes responsibility for the process, choosing durable stock and sealing end grain, so you work with a coordinated team rather than multiple trades. In addition to having our crews install drip caps on your roof and make sure there’s proper forward sloping, this also means working together as part of one team instead of with different tradespeople.
Whether you are learning how to fix a rotted windowsill or planning a window replacement, execution determines whether a repair lasts; contact ACN Construction for a custom quote reflecting your scope. Estimates are preliminary and subject to change after site inspection and a full scope review; project outcomes, timelines, permitting, material availability, and unforeseen issues may vary by jurisdiction. Consult a licensed contractor and verify credentials with Colorado Department of Regulatory Agencies (DORA). We bring craftsmanship and accountability to your exterior project.
Request Your Custom Repair Quote
You’ve now mastered the techniques for repairing a rotted windowsill, from applying epoxy consolidant to shaping and sealing the repair. But when the damage is extensive or you want a guarantee, professional help can ensure a lifetime of durability. At ACN Construction, we specialize in exterior repairs and design-build solutions that address the root causes of rot. We stand behind our work with our lifetime warranty on eligible projects. You can reach us by phone at +1 720 277 6568 to discuss your repair needs. Our office is located at 7388 S Revere Pkwy, Unit 904, in Centennial, Colorado, and we serve the Denver metro area and Parker. Visit our about page to learn more and request your custom quote today.
Request Your Custom Repair Quote
Resources